Materials needed:
- bald cap
- water spray
- hair gel
- spirit gum
- spirit gum remover
- alcohol
- super Baldiez
- pin tail comb
- hair gribs
- supercolor
- foundation
- towel or cape to cover your model
- stipple sponge
- wet wipes
- coach roll
- baby buds
- aquacolor
- fullers earth
- colored spray for body and hair

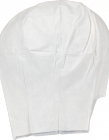
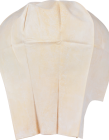
Pre-Impression Bald cap

Latex Bald cap
Both can be found at Kryolan
some general notes:
- using super baldiez thin down with alcohol
- baldiez ->use acetone
- rubber bald caps- you can smooth out edges with latex
- watermelon bald caps-> use super baldiez and blend with alcohol
- you can wear wigs over bald caps-> for example of you do thinning hair
- buy some cheap bald caps for practice
- make sure to have spare ones when using it for assessment (or somewhere else) just in case something goes wrong
Application- Steps:
- make sure you set up your work space
- cover model with towels
- clean models face
- don't apply moisturizer on areas where you will stick the bald cap on, only use toner there
- wet hair down a bit and brush through
- use strong hair gel or water spray to flat down the hair -> it is very important that the hair is flat otherwise the head will look bumpy later
- get hair as near to being head shaped as possible->should look natural later
- when you try to flatten long hair(everything longer than shoulder length), apply the gel(a lot of it) first and comb through-> divide hair in the middle and wrap it around head but make sure it is flat so it isn't noticeable through the bald cap
- for shorter hair gel it all to one side
- get all the hair off the face
- have always tissues or wet wipes by your side so your can wipe and clean your hands
- can't use any pins or gribs
- use soap or wax for baby hair
- put the bald cap over the top of the head-> ask model to help and hold the hair down while you pull the cap over
- the long side of bald cap goes in the back
- don't cut anything off until you have positioned the bald cap accurately and are happy with how it looks
- when cutting around face, place your fingers between skin and scissors to make sure you are not harming them
- carefully use pin tail comb to put any hair back that come off-> don't damage the bald cap! be careful!
- then pull cap down the neck
- cut off any excess until your are under ear height->cut around the ear but not in a round shape
cut it out like this
- ask model to stretch their neck/head forwards and cut the bit at the neck off
- don't stretch it don't too much when you cut otherwise it can happen that the cap will be too short afterwards
- peel back front of bald cap
- when applying the glue tell model to tilt the head back slightly and she should have her eyes closed at all times when applying glue and later when blending with acetone( or alcohol)´
- apply the spirit gum and wait until it is tacky
- apply also spirit gum on skin where the cap will be
- pull the front bit back over and press it down with a damp piece of coach roll ( can also use an old powder puff or damp towel to press it down
- make sure to get rid off any air bubbles
- glued on parts become see-through-> edges start to disappear
- finish glueing on the rest of the bald cap
- blend pre-impression bald caps with acetone and baby buds-> models eyes must be closed
- any bagging around neck area is normal if the bald cap isn't custom made for the model
Colouring- Steps:
- get your supercolor palette and a sponge
- use a mixture of red and pink to cancel out the dark tones of the hair
- now go over with foundation ( or other colours depending on what your are doing)
- match skin tone to foundation and stipple over the rosy covered head
- powder
- could also use fullers earth depending on your design-> when using it:it gives a dry cakey look or like mud, mix fullers earth powder with water in a bowl and apply it straight onto the head, skin(wherever you need it)->don't put fullers earth into the sink/drain->it can block it,
- you could use fullers earth as face mask as it is like the clay mask you can get in any drugstore
- use a hair dryer to get it to dry more quickly
- create textures using an Afro comb(just an example)
- you can add aquacolor over it or even spray colored spray onto it( for example make it golden)
I really would have liked to practice with the bald cap as well but unfortunately I am a bit short off money at the moment. But I will get one just before I go home over Christmas and practice on my sister. This lesson was very interesting and it was amazing to see the others working with bald caps and see the transformation of their models.

No comments:
Post a Comment